Liquid Silicone Rubber (LSR) is widely used in medical, baby care, automotive, and consumer electronics industries. To manufacture LSR parts effectively, precision tooling is essential. The success of LSR injection molding depends heavily on the quality of the LSR injection tooling — including mold design, material selection, machining, and finishing processes.
In this guide, we’ll walk through every step of producing high-quality LSR injection tooling, from design considerations to maintenance tips, ensuring consistent production and long-term value.
1. What Is LSR Injection Tooling?
LSR injection tooling refers to the custom-built molds used in the injection molding process to shape Liquid Silicone Rubber into precise, functional components. Unlike thermoplastics, LSR is a two-part thermoset elastomer that cures inside the mold at elevated temperatures, requiring specialized tooling that can handle heat, pressure, and material behavior.
2. Key Features of LSR Injection Tooling
- High-Temperature Resistance
Tooling must withstand curing temperatures (typically 160–220°C). - Vacuum or Vented Cavities
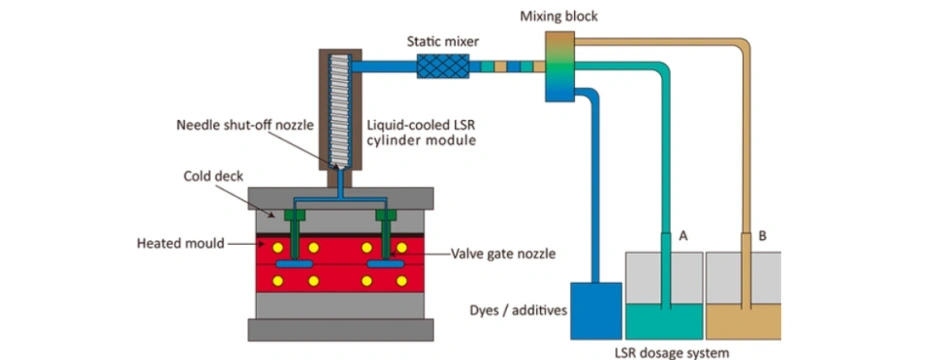
To eliminate air traps and avoid bubbles in the final parts. - Cold Runner System
To manage LSR viscosity and minimize material waste. - Precise Parting Lines and Ejection
Because LSR is highly fluid, tight tolerances are critical. - Polished Surfaces
Especially for medical and baby care parts to ensure smooth, flash-free results.
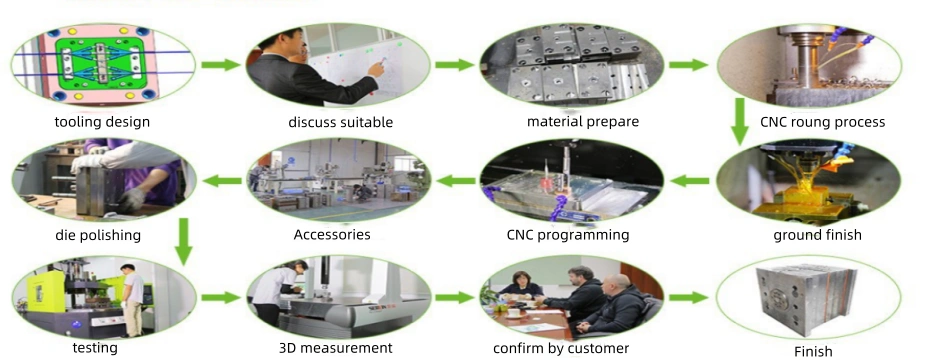
3. Step-by-Step Guide to Producing LSR Injection Tooling
Step 1: Part Design and Moldability Review
Before creating the tooling, evaluate the product’s 3D model for moldability:
- Draft angles for demolding
- Wall thickness uniformity
- Undercuts that require side actions
- Gating position for optimal flow
- Venting and air escape paths
Tip: Use mold flow analysis to simulate LSR filling behavior before finalizing the mold design.
Step 2: Tool Design and Engineering
Tooling is often designed using advanced CAD software. Consider:
- Number of cavities: single-cavity vs multi-cavity molds
- Core and cavity layout
- Cold runner vs hot runner: LSR generally uses cold runners
- Gate type: valve gates or edge gates
- Ejection system: stripper plate or air ejector
- Material shrinkage compensation
Design for maintainability is key — ensure the mold can be easily disassembled and cleaned.
Step 3: Material Selection for the Mold
Common materials for LSR injection tooling include:
- Hardened steel (H13, S136) – excellent for long mold life and corrosion resistance
- Stainless steel – ideal for medical or food-grade production due to hygiene and corrosion resistance
- Aluminum – used in prototyping but not ideal for long production runs due to lower wear resistance
Tool steel should be heat-treated and precision ground to ensure tight tolerances and resistance to wear and high temperatures.
Step 4: CNC Machining and EDM Processing
The precision of LSR tooling relies heavily on high-accuracy CNC machining:
- 3-axis and 5-axis CNC are used for contour surfaces
- EDM (Electrical Discharge Machining) for complex features, tight corners, and fine tolerances
- Polishing and texturing follow, especially for baby or medical-grade products
Use high-speed milling for steel to avoid warping and ensure flatness in the parting line.
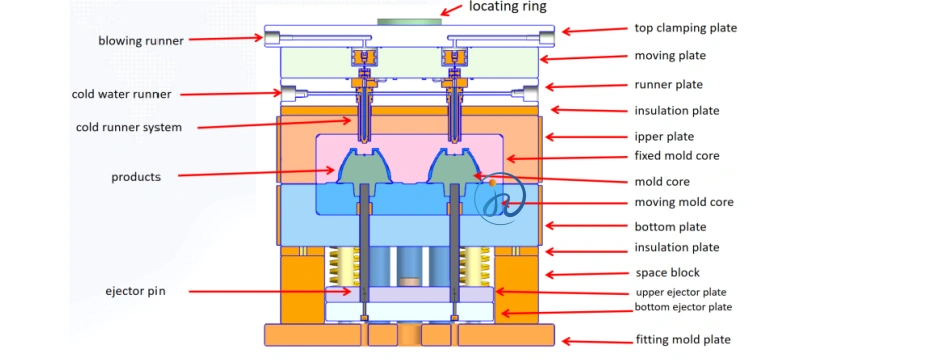
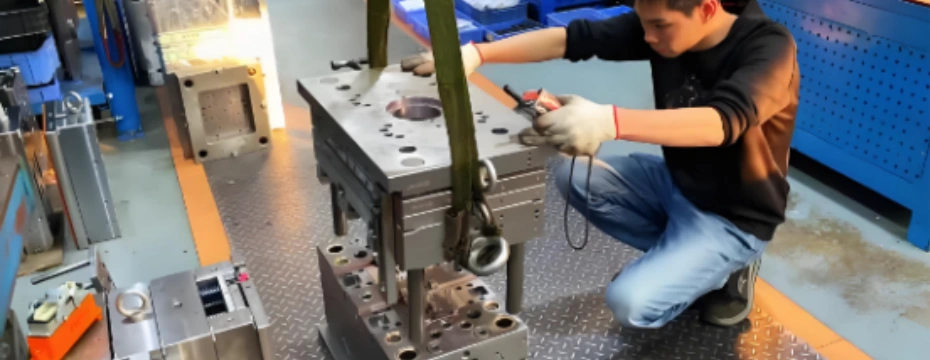
Step 5: Mold Assembly and Fitting
Once the components are machined:
- Assemble the core, cavity, support plates, runner system, and ejection parts
- Test for alignment, vacuum seal, and proper venting
- Adjust parting line and gate balance if needed
Tight seal fitting is critical because LSR is low-viscosity and prone to flashing.
Step 6: Mold Trial and Validation
Conduct a T0 mold trial using the actual LSR material:
- Check filling balance and curing time
- Inspect for flash, short shots, or air traps
- Adjust temperature, pressure, and gate position if necessary
Use dimensional inspection (e.g., CMM or vision systems) to validate mold accuracy and repeatability.
4. Common Challenges in LSR Injection Tooling
| Challenge | Solution |
|---|---|
| Flashing at parting line | Improve seal surfaces and increase clamp force |
| Air bubbles in part | Add venting or vacuum system |
| Uneven curing | Optimize gate placement and heating |
| Short tool life | Use hardened tool steel and maintain regularly |
5. Maintenance and Longevity of LSR Tooling
Regular mold maintenance is crucial to ensure long-term performance:
- Clean vents, gates, and ejector pins after each production cycle
- Inspect wear points and re-polish critical surfaces as needed
- Store in dry, controlled environments to avoid corrosion
Proactive maintenance can extend mold life from hundreds of thousands to millions of cycles.

6. Customization Options for LSR Tooling
Depending on your application, LSR injection tooling can be customized with:
- Interchangeable inserts for multi-product compatibility
- Two-shot tooling for overmolding with PC or other plastics
- Stack molds for increased productivity
- Micro molding capabilities for ultra-small parts
Work closely with experienced mold makers to determine the best solution for your specific part geometry and volume.
7. Cost Factors of LSR Tooling Production
The cost of LSR injection tooling varies based on:
- Number of cavities
- Tool complexity and material
- Precision level required
- Mold size and projected lifespan
Typical ranges:
- Prototype mold: $3,000 – $8,000
- Production mold: $10,000 – $80,000+
Conclusion
Producing high-quality LSR injection tooling requires technical knowledge, precision equipment, and industry experience. From part design to mold maintenance, every step plays a vital role in ensuring successful LSR injection molding. By following a systematic tooling development process and working with a reliable manufacturer, businesses can achieve cost-effective, repeatable, and high-performance silicone parts.
If you are looking for a trusted partner in LSR tooling design and production, Jiaze Silicone offers end-to-end services — from mold engineering to LSR injection molding. Contact us to learn more.